Bagi pemula memilih gitar adalah hal yang belum pasti karena mau main apa sih kepinginnya. Karena masa-masa awal bermusik biasanya kuping menyenangi semua denting gitar. Semua terdengar menarik dan ingin memainkannya. Namun pada dasarnya ada 2 kriteria yang patut dipahami sebelum salah pilih.
Gitar Nylon String
Gitar dengan snar nylon adalah termasuk katagori gitar klasik. Ciri-ciri gitar klasik adalah mempunyai neck atau fretboard yang lebar. Gitar ini biasanya dipakai memang untuk memainkan lagu-lagu klasik atau flamingo ya mexicoan atau spanyolanlah. Kalau pernah dengar lagu Romance de amor ini lagu klasik.
Kalau ingin memainkan lagu klasik pilihlah gitar dengan snar nylon. Banyak musisi besar datang dari memainkan klasik pada awalnya. Sehingga muncul genre yang kita kenal dengan klasik rock. Sebut saja nama Yngwi atau Blues Saraceno yang memainkan lagu klasik ‘Bouree’ dengan sangat manis dengan gitar elektrik. Musisi musik klasik yang sangat tenar dan mengguncang dunia klasik pada jamannya sampai sekarang adalah: John William, Al Di Meola, John Mc Laughlin (sekarang banyak di Jazz Blues).
Merek gitar klasik yang paling gampang dicari dan umum di Indonesia adalah Yamaha dari type G. Di Bandung dulu pernah beredar merek Genta keren juga. Merek lain di kota-kota besar beredar juga Fender sampai Gibson.
Gitar Steel String
Bagi pemula yang berencana belajar melodi, musik rock, blues atau tidak belajar klasik sebaiknya memilih gitar dengan snar steel ini. Ciri-ciri gitar ini mempunyai neck atau fretboard yang ramping.
Karena gitar ini bertali kawat baja maka kecenderungan stang akan menjadi bengkok. Ini masalah utama pada gitar steel string apalagi kalau ia murahan! Maka sebenarnya waktu milih gitar steel string kita harus mengerti stelan standar gitar. Ajaklah teman yang mengerti nyetem standar ini. Ada alat yang namanya ‘Tuner’ yaitu standar nada pada umumnya yang dipakai nyetem gitar biar nadanya standar. Kalau gitar tidak bisa distel standar, pemula yang kebanyakan belajar nyari lagu dari cd atau kaset nantinya susah mengikuti nada-nada tersebut. Kang Iwan Fals kalau manggung memakai gitar acoustic electric. Acoustic electric bagus kalau rencana mau record acoustic gitar dengan cara DI (direct input).
Saat memilih gitar juga perhatikan fret jangan sampai ada satu nada yang mati karena fret ketinggian di salah satu tempat. Bisa diperbaiki sih tapi kan repot. Cobalah ambil chord dekat dengan bodi. Saya biasanya juga melakukan cek nada satu persatu di atas fret. Lihat stang apa juga lurus dengan cara melihat dari ujung bodi ke headstok atau sebaliknya. Ya kayak membidik dengan senapanlah. Nggak usah malu karena pemula dari pada salah.
Acoustic Electric
Kalau emang milih gitar dengan electriknya sekalian, jangan lupa nyolokin ke amp cabinet yang biasanya juga ada di toko gitar.Tentu kalau ada amp yang acoustic. Ini penting sekali karena terkadang salah satu snar mempunyai sound out yang tipis. Atau frekuensinya tidak seimbang. Yang benar itu suara harus rata. Atau nanti waktu melodi satu snar nggak kedengaran. Terkadang dagangnya bilang kalau tahu anda pemula: ‘Biasa seperti itu kalau gitar akustik elektrik’. Itu sama sekali tidak benar!
Merek gitar string yang banyak beredar di Indonesia adalah Takamine dan sering juga saya lihat banyak musisi Indonesia yang pakai. Harga cukup murah. Namun kalau mau yang bermerek lain ada: Ovation, Martin, Taylor, Fender, dsb. Di hompage itu gitar akustik aku. Ovation black yang udah didandani perak. Ovation back bodinya enak nggak tebal.
Source : http://www.madeblues.com
selengkapnya...
Showing posts with label All About Guitar. Show all posts
Showing posts with label All About Guitar. Show all posts
Thursday, 10 October 2013

Thursday, 27 January 2011
How To Read Chord Diagrams
You will find that chord diagrams vary quite a bit in how they are graphically represented. They are interpretative and some arrangers prefer to have more information shown in a chord diagram than others. I fall into the category of showing as much information as possible within each diagram.
Lets take a look at a typical chord diagram you will see in this section of Ultimate Guitar Chords:
 In the Diagram above, which will be a standard chord diagram you will see here. we have the following:
The Letter at the top left of the Diagram is the Name of the Chord. In this case it is an F Major chord.
If you see an arced line, like in the above example that spans the same finger number (in this case the index finger), it means it is a bar chord and your finger should span all the way from the first string to and including the 6th string.
The Heavy Horizontal line, if there is one, represents the guitar nut.
The Solid Black Dots with the numbers inside the dots, represent the finger location and the Left Hand Finger that is being used:
1 = Index Finger
2 = Middle Finger
3 = Ring Finger
4 = Pinky Finger
The Roman Numerals indicate the fret numbers to give you a reference point on the fingerboard.
The Horizontal Lines represent the frets on the fingerboard.
The Vertical Lines represent the 6 strings of the guitar.
The Letters you see below each string at the very bottom of the diagram indicated the not that is being played as fingered in the diagram.
If you see a "0" or a zero above a string it means this string is to be played without a finger or open.
If you see an "X" above a string, it means that string is not to be played as part of this chord.
Sumber : http://www.ultimate-guitar-online.com
selengkapnya...

Friday, 21 January 2011


How to Build a Guitar in 62 Easy Steps!
| Appendix C - Design Diagrams |
| You simply can’t go out, buy some wood, and start glueing it all together. You have to have a detailed plan. This includes accurate drawings of the front of the guitar as well as a section through the center of it. I enjoy doodling my ideas on scraps of paper as thoughts come to me. As I refine those ideas, I’ll input them into my AutoCAD program to work out the details and exact measurements. It’s a good exercise in using both halves of your brain; sketch and refine. On the following pages are numerous design exercises which I went through on this build. Many times I went through many versions of a particular component only to come back to my first idea. That’s ok; it just reaffirmed my initial choice and let me know that I’ve explored all of my options. These diagrams have been reduced in size to fit in this book. Also, AutoCAD does not talk to my word processor very well. Thus, some diagrams will be a little difficult to read. This is mostly to show you that you need to do a lot of sketching and ciphering to get your design to work. There’s a lot that goes on behind the scenes which no one will ever really see. All of your drawings should be done in minute detail and to full scale. |
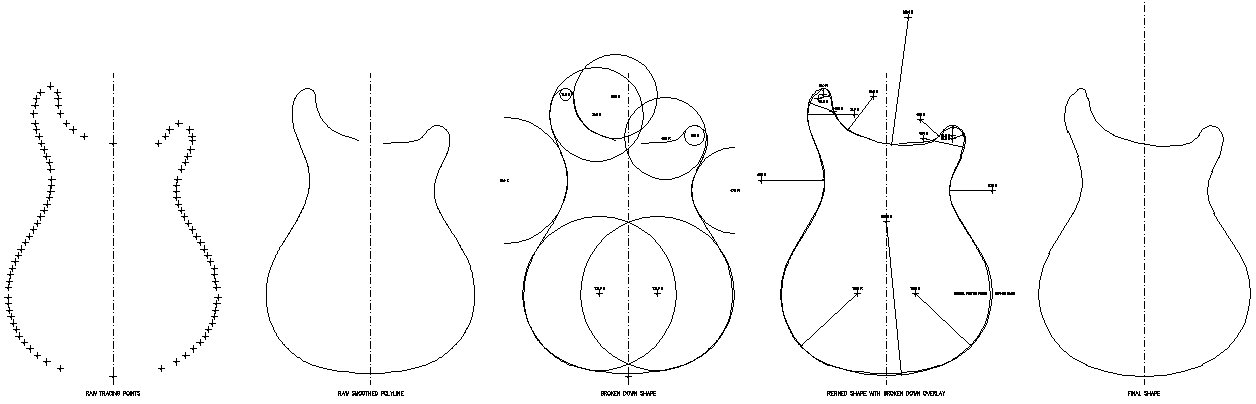 |
Even though we traced a Paul Reed Smith body, we still needed to plot out the points so it could be input into AutoCAD accurately (sketch 1 above). After connecting all the dots (sketch 2), I found that the pen I traced the guitar with probably wandered around a bit. I refined the layout by breaking down the design into it’s individual arcs and lines (sketch 3). I then polished up the geometry, got the body perfectly symmetrical, and tweaked a few arcs (sketch 4). Ultimately, this led to the ultimate body shape which we could work with (sketch 5).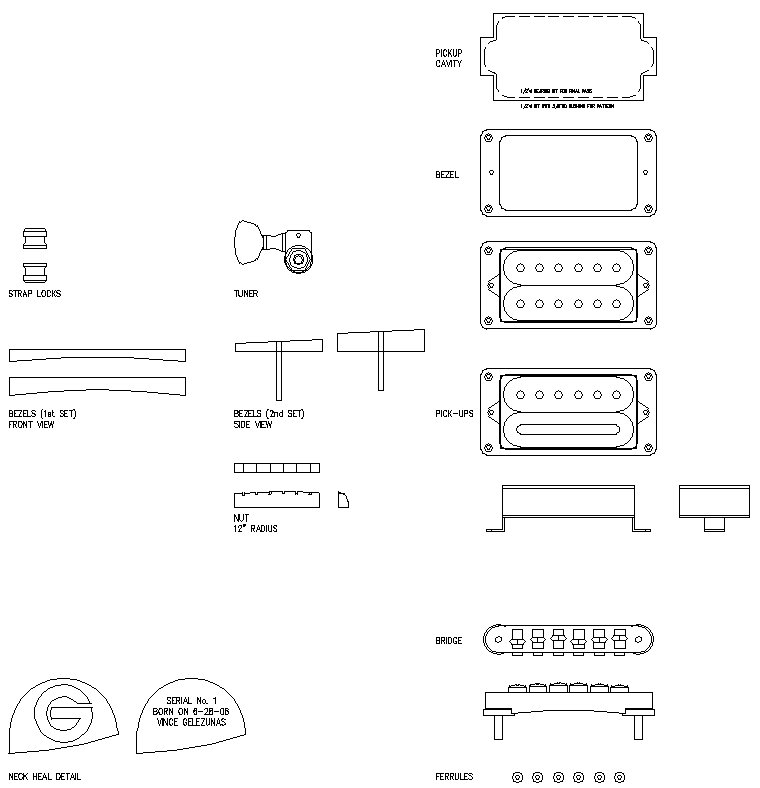 You need to have all of your hardware in hand before you can complete your design. Obviously, you want to make sure everything will fit. After receiving the hardware, I got out my calipers and transfered all of the dimensions into AutoCAD. With all of these individual parts in the computer, I began to arrange them on the guitar body I drew up previously. Preparation and accuracy are paramount when dealing with the fine level of detail involved in guitar building. Take your time and get it right the first time. Fixing a screw up later on down the line is at best difficult, and it can be impossible. These sketches depict both top and side views of many of the pieces of hardware. |
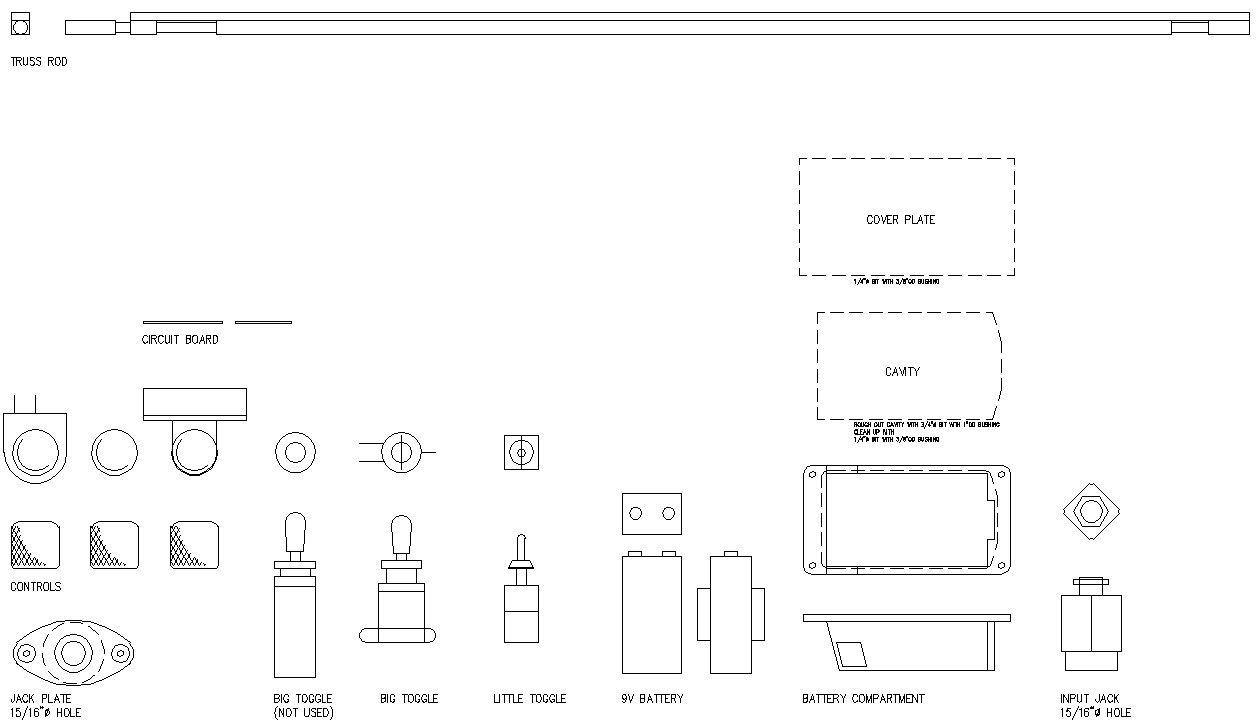 You might think that the knobs and switches are trivial, that is until they won’t fit into your control cavity. This exercise informed me that the 3-way switch was too tall and would end up poking Brian in the pecker while he was playing. That may have lent some added inspiration to Brian’s improvisations; however, it wouldn’t have looked very good (neither his pecker nor the guitar). I also had a large battery compartment which needed to be accommodated within the body of the guitar. These diagrams helped layout the routing templates used to cut the cavity and wiring channels. It’s important to document and verify everything before you start cutting any wood. |
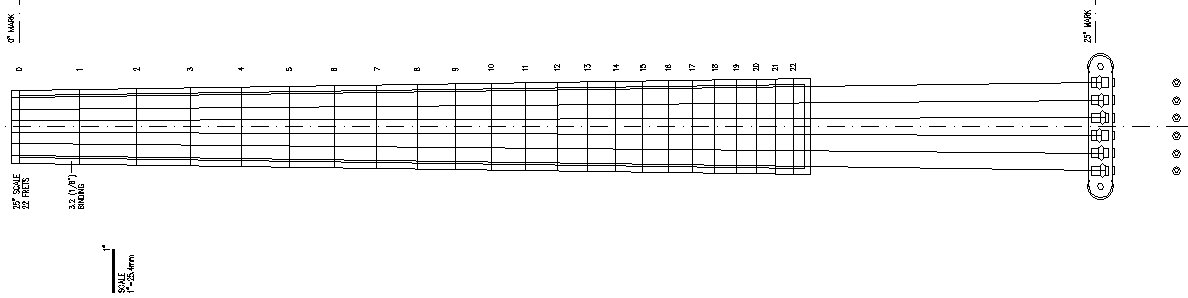 |
The dimensions of the nut and bridge are required to properly layout the neck. They define the width at each end of the scale. The desired scale length defines the distance between the nut and the bridge. Combining all of this data will dictate the taper of the fretboard. Use a fret spacing chart (which can be found on the internet) to help layout your fret locations.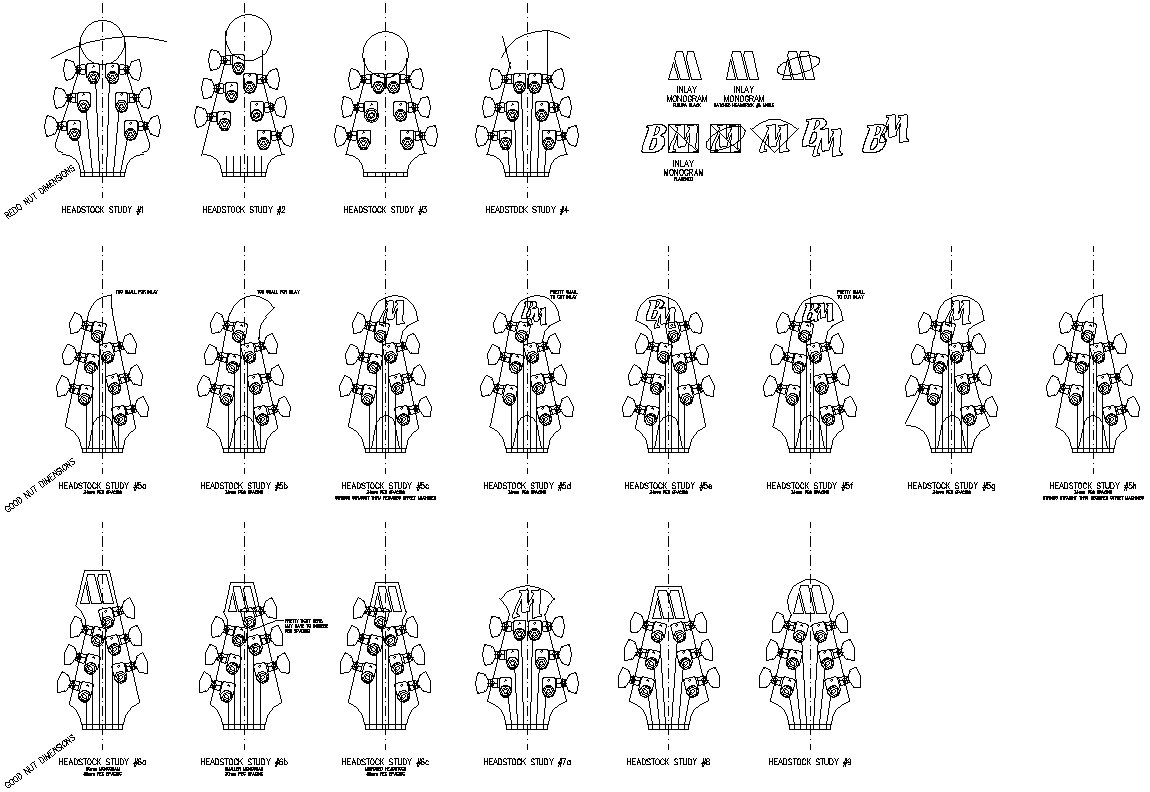 The headstock is the signature area on many guitars. You can tell whether a guitar is a Stratocaster or a Les Paul simply by looking at the headstock. It also lends a convenient spot to sign your own artistry via an inlay. We went through many different design schemes on the headstock and ended up with one of a very simple design. |
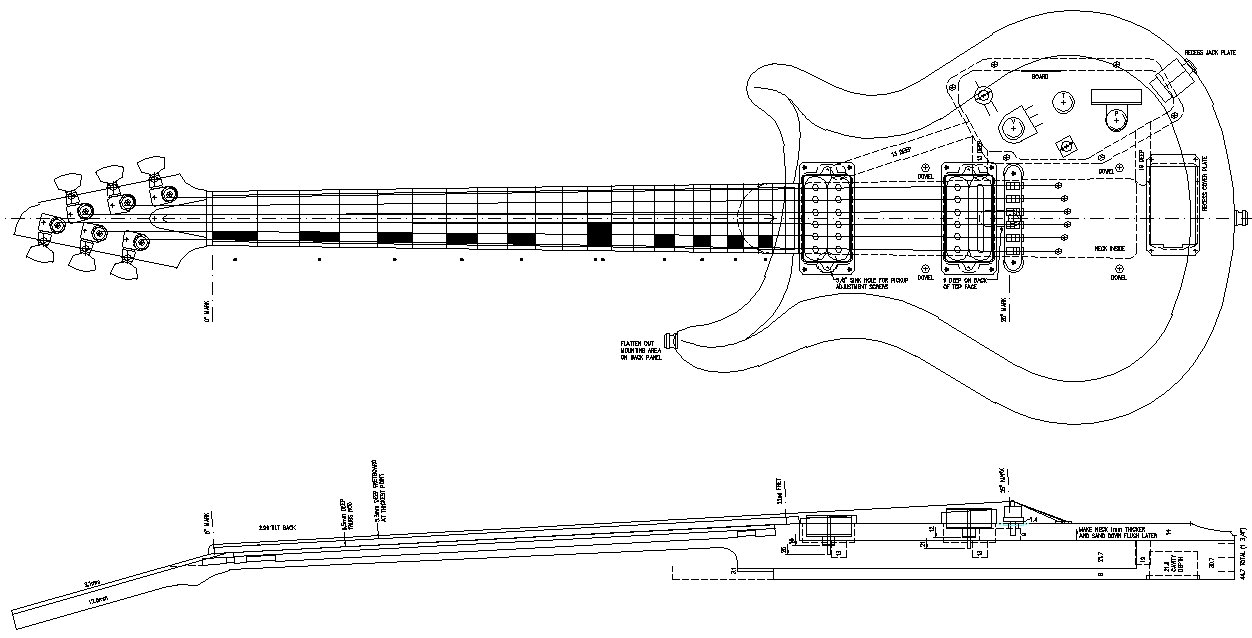 |
| Once you have all the bits a pieces documented and input into the computer, I started laying out everything on the guitar and putting the big picture together. A plan and section of the guitar was drawn accurately to scale. These drawings were printed out and directly used to make all of the templates. Wiring channels were laid out making sure they didn’t interfere with the bridge mounting posts or dowel locations. Knobs and switches were located and the control cavity was designed to accommodate them while avoiding cutting into the neck pocket. The height of the bridge will define the amount the neck will tilt back from the body of the guitar. This is evident in the section through the guitar. Make as many notes to yourself on these drawings as needed; these are your blueprints and patterns. This is the time you really get your guitar figured out in minute detail. Don’t leave anything left to figure out later as by then it might be too late. |
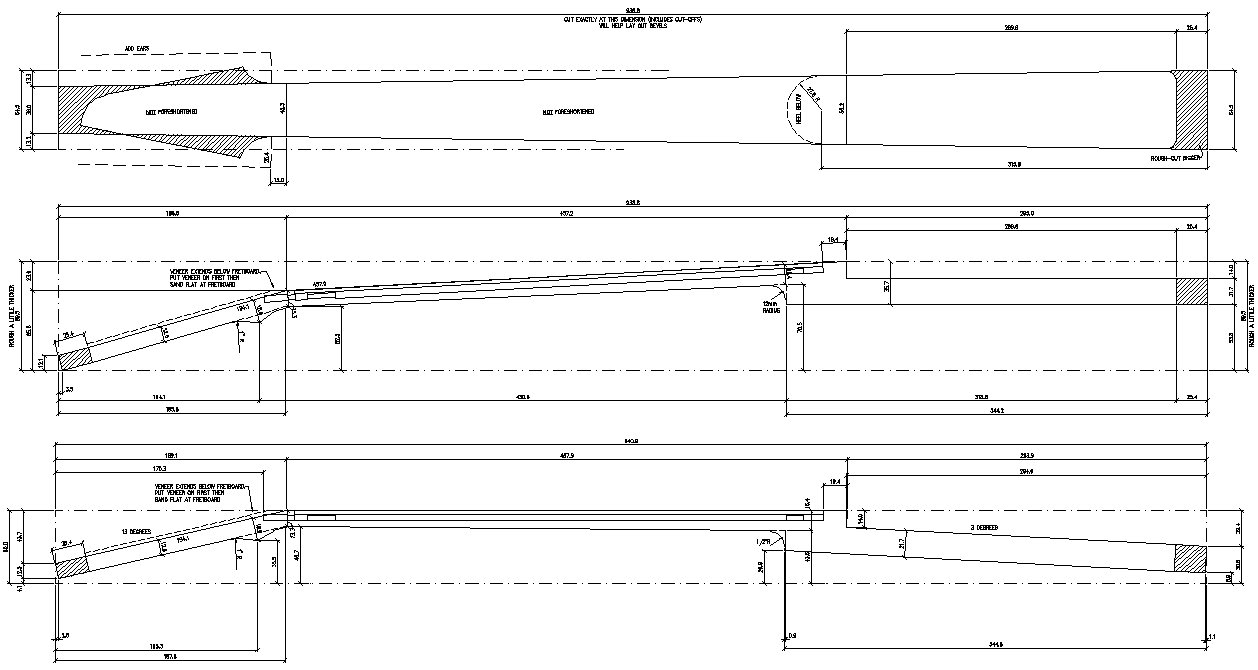 |
| The single most important layout you’ll need to devise is for the neck. If you get the neck wrong, it might render your new guitar useless. Since our neck was set into the body, we had a few more angles and cuts to make. The top sketch is a top view of the neck. The bottom two sketches are sections of the same neck, but showing how it could be cut from the block of wood in two different fashions. I chose to go with the bottommost layout since I could keep the fretboard surface (the most critical surface) untouched and dead flat. This layout is fully dimensioned since I would not be using a template to cut out the neck. I had to transfer all of the dimensions to the block of wood with a pencil, ruler, and square. This opens up an area for inaccuracies or transcribing errors, so double-check everything ... and then check it again. sumber : |
selengkapnya...


Pentatonic Scale
If you want to master the theory of music, there is no way out but to learn the guitar scales charts. For excelling in the guitar lessons and become a professional guitarist, you must know what the scales are and how important they are. While learning the scales, you get to learn about harmonics and pitch. You also get to know about flats and sharps. Good sounding note composition is possible only if you know which note combinations are discordant to ear and which notes would sound good.

If you learn guitar scales charts, it enables you to play any tune pretty fast without making it dull to ears. The riffs and solos expert guitarists play many times sound pretty dull when played slowly and sound extremely crispy when played fast. The pentatonic scales are the reason why these notes sound good fast. Beginners may use a major or minor scale. But learning the combination of five notes is must with pentatonic.
selengkapnya...
If you learn guitar scales charts, it enables you to play any tune pretty fast without making it dull to ears. The riffs and solos expert guitarists play many times sound pretty dull when played slowly and sound extremely crispy when played fast. The pentatonic scales are the reason why these notes sound good fast. Beginners may use a major or minor scale. But learning the combination of five notes is must with pentatonic.
sumber : http://www.guitarlearninglesson.com
selengkapnya...

The Eight Essential Beginner Open Chords
All there chords are covered in the Beginners Course. If you don't know them I would strongly suggest you going through the course and learning them properly - as well as knowing the shapes you should learn how to practice them, use them and change between them!
Click on the chord to go to a lesson that teaches it!
 |  |  |
 |  | |
 |  |  |
Dominant 7th Open Chords (Beginners)
Dominant 7th Chords shapes are really cool for blues and folk. They are taught in my Beginners Course too. These are all essential chords and every guitarist worth their salt should know these too!
Click on the chord to go to a lesson that teaches it!
 |  |  |
 |  |  |
F Chord For Beginners
The F Chord is famous for being a bugger to learn. Check of the lessons on the Beginners Course so you work out which one is the one for you for where you are at right now...
Click on the chord to go to a lesson that teaches it!
 |  |  |
Suspended Open Chords (Beginners)
Suspended chords are usually used to embellish normal chords - so it's important to learn how to use them, not just what the shape is! Again, these are covered in the Beginners Course...
Click on the chord to go to a lesson that teaches it!
 |  | |
 |  | |
 | <--- no lesson on this Esus2 because it doesn't sound as cool, it's not as easy to use at the others. I've just included it here for the sake of completion! It kinda looks like a B Power Chord but with the E bass note. |  |
Common Open Slash Chords (Beginners)
No they have nothing to do with Slash from Guns 'n' Roses - they are chords with a bass note other than the root. These are all covered in the Beginners Course and are all very common and sound cool. There are many thousands of possibilities, but these are the ones you are most likely to find in the real world because they sound good!
Click on the chord to go to a lesson that teaches it!
 |  |  |
Power Chords (Beginners)
These are the starting point for barre chords, learning these first will make the transition to full barre grips a load easier! They again are part of Beginners Course... The cool thing is that the shape remains the same, you just have to move them around! Click on the chord shapes to get the full lesson and learn how to use the root notes and all that! It's real important...
Click on the chord to go to a lesson that teaches it!
 |  |
E Shape Barre Chord Grips (Intermediate)
These are covered in The Intermediate Course and links will be added when the course is fully live...
 |  | |
 |  |
A Shape Barre Chord Grips (Intermediate)
These are covered in The Intermediate Course and links will be added when the course is fully live...
 |  | |
 |  |
Triad Chord Grips (Intermediate)
These are covered in The Intermediate Course and will be added when the course is fully live... but I also have a lesson on them that I will pull down once the intermediate ones are live, cos I think I did the lesson better on that and it's essentially the same!
 |  |  |
The CAGED System (Intermediate)
I have a 6 lesson series on The CAGED system, starts with a video and is then text and illustrations (it's also the last part of Practical Music Theory) and at this stage you really need to understand what it is and how it works and WHY it's so important!
Extended 4 Note Chords in The CAGED System (Intermediate)
I explain a great way to learn and UNDERSTAND most of the extended 4 note chords in the CAGED System in myChord Construction Guide ebook. It really works and will help you understand how barre chords are constructed and how to play them - if you do it properly you no longer need to memorise hundreds of chords, you will understand how to create them from the basic CAGED shapes! See the unedited reviews in the forum here. It really works!
Basic Jazz Chords (Intermediate)
This lesson cover the ten jazz chords that you will need to get down to start playing jazz. I made it for the jazz section - but it is needed here too ;) JA-001 • Basic Jazz Chords
Click on the chord to go to a lesson that teaches it!
 |  | |
 | | |
| | |
 |  | |
 |  sumber : http://www.justinguitar.com |
selengkapnya...
Subscribe to:
Posts (Atom)


Followers


